Progressive JPEG: 6.3% Smaller, Same Pixels, Slower Decode
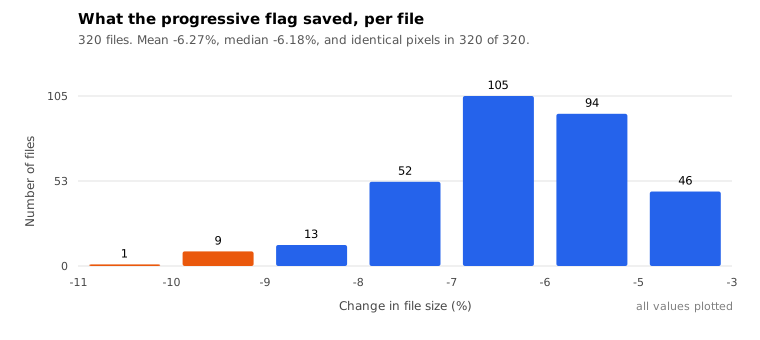
On 320 photos, the progressive box saved 6.27% and changed zero pixels. It also made decoding 2.5 times slower. Both numbers, and when the trade makes sense.
Every export dialog has it: Progressive, sometimes called interlaced. It is a checkbox, it is off by default in most tools, and the tooltip does not tell you what it does.
We measured it on 320 photos. Same image, same quality 90, same chroma settings, same encoder, one parameter changed. The answer is more interesting than "smaller files".
What actually changes
A baseline JPEG stores the image top to bottom in one pass. A progressive JPEG stores the same data in several passes: a rough version first, then refinements. In a browser, that means you see a blurry whole image quickly instead of a top half.
The thing people miss: the coefficients are identical. Both modes quantise the same DCT blocks with the same tables. Progressive just writes them in a different order, in more scans, which lets the entropy coder do a better job. The decoder reassembles exactly the same numbers. Two things follow, and we can check them rather than assume them.
The numbers
320 JPEGs, resized to 768 px on the long edge, encoded at quality 90 with 4:4:4 chroma.
- Size: 261.0 KB to 244.0 KB, a mean saving of 6.27% (median 6.18%)
- Score: 87.840 versus 87.840. Mean delta 0.0000, and the largest deviation on any single file was also 0.0000.
- Pixels: byte-identical RGBA in 320 of 320 files.
- Decode time: 5.67 ms to 14.26 ms per image, a 153.6% increase. All 320 decoded slower.
All 320 files got smaller. Best case −10.8%, worst case −3.0%.
So the premise holds exactly. Six percent of your bytes come back, the image is not altered in any way, and you pay for it in decode time.
How much is 8.6 milliseconds
In absolute terms the penalty is 8.6 ms per 768 px image on the machine that ran this. That is nothing for a gallery page or a file you are emailing.
The penalty is small in absolute terms, but it stops being small in three situations:
- Old or cheap phones, where JPEG decode already runs on a weak core. A 2.5× multiplier on a 40 ms decode is 100 ms of jank per image.
- Huge images. Decode cost scales with pixel count while the size saving stays proportional. A 40-megapixel progressive still takes several passes.
- Server-side thumbnailers doing thousands of files, where you are paying CPU on both ends. If none of those apply, the trade is one of the few in this field that is almost free.
Why the checkbox is off by default
Progressive decoding needs a decoder that keeps partial state, so it is more code and more memory. In 1995 that mattered a great deal. The baseline mode was the safe lowest common denominator, and defaults calcified around it. Modern browsers handle progressive without difficulty and have for a long time.
There is one historical cost worth knowing if you serve ancient clients: some very old decoders, and a few embedded ones, only handle baseline. If you are targeting something exotic, baseline is still the safer answer.
What to do
- Serving images on a website: turn it on. Smaller files, identical pixels, and the blurry-then-sharp render is usually a better experience than a half-loaded image.
- Email attachments and anything you are sending to a person: turn it on. The size saving is real and nobody will notice the decode.
- Very large images or very weak target devices: leave it off, or test the decode on the actual device.
- Anything that gets re-encoded later: it does not matter. The next encoder will re-do the coefficients either way.
The one thing it is not is a quality setting. It sits in the same dialog as the quality slider, which is why people assume it trades quality for bytes. It does not touch the quality at all.
Caveats
Encoder: Pillow's libjpeg, not mozjpeg or jpegli. The size saving would shift a little with a different encoder, but the zero-pixel-difference result is a consequence of the format, not of the implementation.
Decode timings are from one machine and one Python process, five runs per file with the median taken. Treat the multiplier as an order of magnitude, not a benchmark.
Quality 90 and 4:4:4 only. At lower quality the saving may differ, and with 4:2:0 chroma the absolute sizes change but the principle does not. 768 px images, one collection, already-compressed sources.
Reproducing it
tools/measure-progressive.py. It needs Pillow for the encode and the pixel comparison, and ssimulacra2 on the path for the score. About eight minutes for 320 images.
If your files behave differently, the about page has the address. All seven of our measurements are collected on one summary page, and the raw per-file numbers are on the datasets page.